Glass Guides
How to Install Laminated Glass Skylights: Waterproofing and Structural Guide for Chennai Homes
Installing a laminated glass skylight in your Chennai home can transform dark interiors into naturally lit, airy spaces while reducing electricity costs. However, Chennai's heavy monsoons, high humidity, and intense summer heat demand meticulous attention to structural integrity and waterproofing. This comprehensive guide walks you through every step of skylight installation, from selecting the right materials to ensuring your skylight remains leak-free through years of tropical weather.
Understanding Laminated Glass Requirements for Chennai Climate
Laminated glass is the only safe choice for skylight installations in residential properties. Unlike tempered glass, laminated glass consists of two or more glass layers bonded with a polyvinyl butyral (PVB) interlayer that holds fragments together if breakage occurs, preventing dangerous shards from falling into living spaces below.
For Chennai homes, specify 6.38mm laminated glass (two 3mm glass sheets with PVB) as the minimum thickness for small skylights up to 1 square meter. Larger installations require 8.38mm or 10.38mm laminated glass depending on span and wind load calculations. The PVB interlayer also blocks up to 99% of harmful UV rays, protecting your furniture and flooring from sun damage while reducing heat gain by approximately 30% compared to standard glass.
Consider tinted or reflective laminated glass options to further reduce heat transmission. Bronze or grey tints can cut solar heat gain by an additional 20-40% without significantly compromising natural light. Consult with experienced suppliers like RAJA BROS who understand Chennai's specific climate challenges and can recommend appropriate glass specifications for your project.
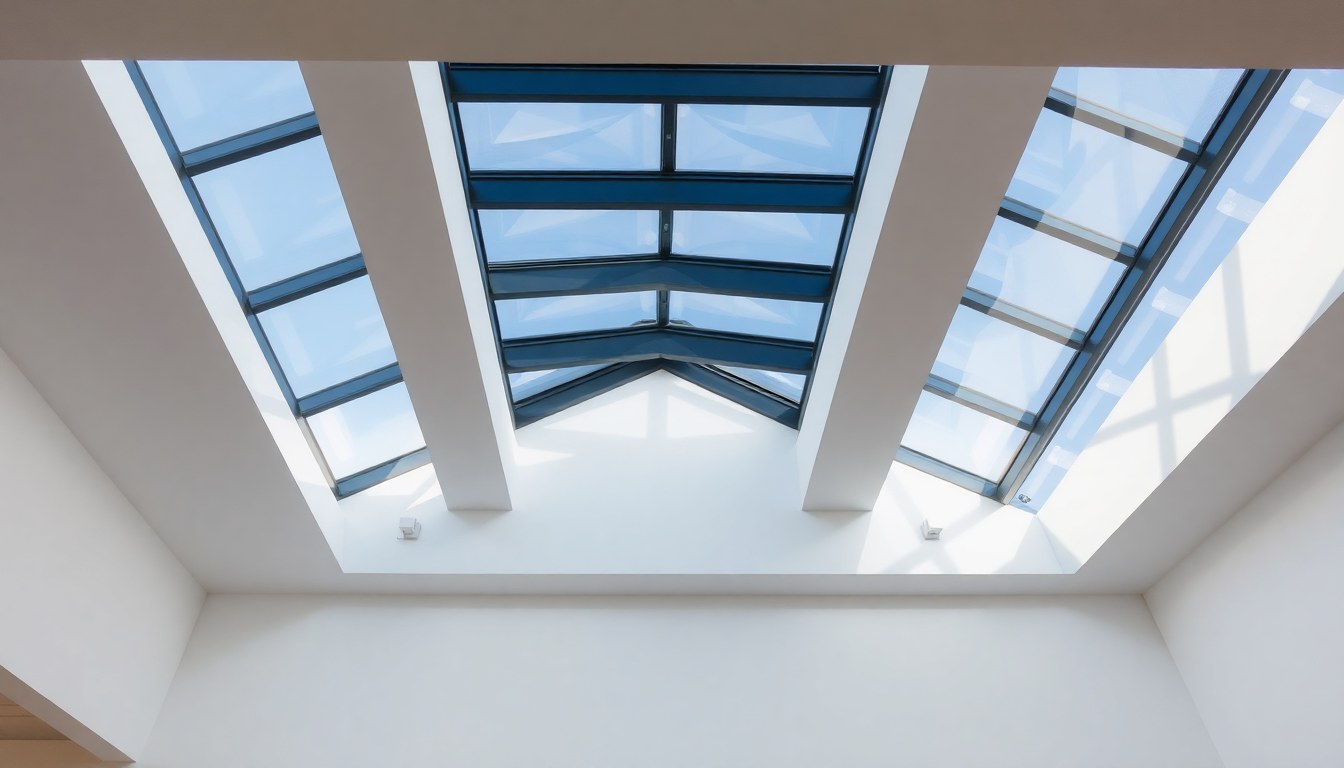
Structural Framing and Load-Bearing Considerations
The structural frame supporting your skylight must accommodate both the glass weight and Chennai's wind loads, which can reach significant levels during cyclonic weather. Most residential skylights use either aluminum or steel framing systems, with aluminum being the preferred choice for its corrosion resistance in humid coastal environments.
Frame Material Selection
Powder-coated aluminum frames with thermal breaks provide the best performance for Chennai installations. The thermal break prevents condensation buildup during monsoon season when exterior temperatures drop while interior spaces remain warm. Choose frames with a minimum wall thickness of 2mm and ensure all joints are welded or mechanically fastened with stainless steel hardware to prevent corrosion.
Steel frames require hot-dip galvanization followed by powder coating to resist rust. While steel offers superior strength for large spans, the additional weight requires stronger roof support structures. Work with qualified professionals such as Studio HD Architects to verify your roof can handle the combined dead load of framing and glass plus live loads from maintenance access.
Roof Opening and Support Structure
Before cutting any roof opening, verify the location avoids structural beams, electrical wiring, and plumbing. The rough opening should be 25-50mm larger than the skylight frame on all sides to accommodate flashing and allow for adjustment during installation. Reinforce the roof opening with doubled or tripled rafters on each side, securely fastened to existing structural members with appropriate connectors.
For flat or low-slope roofs common in modern Chennai homes, construct a raised curb at least 150mm high around the opening. This curb prevents water pooling and provides the necessary slope for drainage. The curb should be constructed from marine-grade plywood or cement board, properly waterproofed before skylight installation.
Waterproofing Techniques for Monsoon Protection
Proper waterproofing separates successful skylight installations from chronic leak problems. Chennai receives an average annual rainfall of 1,400mm concentrated in the northeast monsoon season, making robust waterproofing absolutely critical.
Base Layer Waterproofing
Begin waterproofing at the roof deck level before installing the skylight frame. Apply a continuous waterproof membrane extending at least 300mm beyond the rough opening on all sides. Self-adhered rubberized asphalt membranes work well for this application, conforming to irregular surfaces and self-sealing around fastener penetrations.
For concrete roof decks, apply a two-component polyurethane waterproofing coating in multiple layers, ensuring complete coverage without pinholes or gaps. Pay special attention to corners and edges where water tends to collect. Allow each coat to cure completely before applying the next layer or proceeding with installation.
Flashing Installation
Metal flashing creates the critical water barrier between your skylight frame and roof surface. Use aluminum or stainless steel flashing with a minimum thickness of 0.8mm. The flashing system should include step flashing along the sides, head flashing at the upper edge, and a combination flashing and pan at the lower edge.
Install flashing in layers working from bottom to top, ensuring each piece overlaps the one below by at least 75mm. Seal all flashing joints with polyurethane sealant rated for exterior use and UV exposure. The flashing should extend at least 150mm up the skylight curb and 200mm onto the surrounding roof surface, tucked under roofing materials where possible.
Sealant Application
Use only high-quality, neutral-cure silicone sealants specifically designed for glass-to-metal applications. Acid-cure silicones can corrode aluminum frames and degrade over time in humid conditions. Apply a continuous bead of sealant between the glass and frame glazing channel before setting the glass, then add a weather seal bead on the exterior face.
Install EPDM rubber gaskets between the skylight frame and curb, compressing them adequately to create a watertight seal while allowing for thermal expansion. Add a final bead of sealant at the frame-to-curb junction, tooling it smooth to shed water effectively.
Installation Process Step-by-Step
With materials prepared and the roof opening properly reinforced and waterproofed, follow this systematic installation sequence to ensure a weather-tight skylight that will perform reliably for decades.
Step 1: Test Fit and Adjust
Place the skylight frame in the opening without fastening to verify fit and proper slope for drainage. The skylight should slope at least 15 degrees from horizontal to facilitate water runoff and prevent debris accumulation. Shim the frame as needed to achieve the correct angle and ensure all edges sit flush against the curb or roof surface.
Step 2: Secure the Frame
Once positioning is confirmed, secure the frame using stainless steel screws spaced no more than 300mm apart around the perimeter. Pre-drill holes slightly smaller than screw diameter to prevent frame distortion. Apply sealant to each screw before driving it home to prevent water infiltration through fastener holes. Avoid over-tightening, which can warp the frame and stress the glass.
Step 3: Install Glass Panels
Set laminated glass panels into the prepared frame channels with glazing tape or setting blocks to maintain proper edge clearance. Glass should not contact metal directly, as differential expansion rates can cause stress cracks. Maintain a minimum 3mm edge clearance on all sides, increased to 5mm for panels larger than 2 square meters.
Secure glass with aluminum glazing bars or pressure caps, torquing fasteners evenly to distribute pressure uniformly across the glass surface. Apply final exterior weather seals and inspect all joints for complete contact and proper sealant adhesion.
Step 4: Interior Finishing
Complete the installation with interior trim that conceals the frame-to-ceiling junction while allowing access for future maintenance. Install a condensation gutter at the lower edge if your skylight lacks an integrated drainage system. This simple aluminum channel catches condensation that may form during monsoon season and directs it away from interior finishes.
Maintenance and Inspection Schedule
Even perfectly installed skylights require regular maintenance to ensure continued weather-tight performance. Establish a maintenance routine that includes pre-monsoon and post-monsoon inspections plus periodic cleaning.
Before each monsoon season, inspect all sealant joints for cracks, gaps, or separation. Sealants typically require replacement every 5-7 years in Chennai's climate. Check flashing for corrosion, loose fasteners, or damage from debris. Clear any accumulated leaves, dirt, or debris from around the skylight perimeter that could trap water or block drainage paths.
Clean glass surfaces quarterly using a mild detergent solution and soft cloth or squeegee. Avoid abrasive cleaners that can scratch glass or damage coatings. Inspect interior surfaces for water stains, mold growth, or condensation patterns that indicate potential seal failures requiring immediate attention.
Common Installation Mistakes to Avoid
Learning from others' errors can save you significant time, money, and frustration. These common mistakes plague skylight installations throughout Chennai and are entirely preventable with proper planning and execution.
Never skip the raised curb on flat roofs, even if it seems unnecessary. Without adequate height, water will eventually find its way inside during heavy downpours. Similarly, don't rely solely on sealant for waterproofing—proper flashing and membrane systems are essential primary barriers, with sealant serving as a secondary defense.
Avoid undersizing the structural support. Chennai's cyclonic winds generate substantial uplift forces that can literally pull an inadequately secured skylight from the roof. Calculate wind loads properly and provide adequate fastening, typically requiring professional engineering input for skylights larger than 2 square meters.
Don't use incompatible materials that promote galvanic corrosion. Aluminum frames require stainless steel or aluminum fasteners—never use standard steel screws that will rust and fail. Similarly, ensure all sealants, gaskets, and waterproofing membranes are compatible with each other and with the materials they contact.
Working with Professionals
While experienced DIY enthusiasts can tackle small skylight installations, most Chennai homeowners benefit from professional assistance, particularly for structural modifications, waterproofing, and large or complex installations. Design professionals like InEx Designs Interiors can help integrate skylights into your overall home design while ensuring proper placement and sizing.
Licensed contractors familiar with local building codes ensure installations meet structural and safety requirements. They also carry liability insurance protecting you from potential damages during installation. For custom or architectural skylights, architects can provide engineered drawings and specifications required for building permits and ensuring long-term performance.
Frequently Asked Questions
What thickness of laminated glass is required for skylights in Chennai?
For Chennai installations, use minimum 6.38mm laminated glass for skylights up to 1 square meter. Larger installations require 8.38mm or 10.38mm laminated glass depending on size and wind exposure. Always consult a structural engineer for skylights exceeding 2 square meters or installations in high-wind coastal areas.
How much does it cost to install a laminated glass skylight in Chennai?
Skylight installation costs in Chennai typically range from ₹15,000 to ₹45,000 per square meter depending on glass specification, frame quality, roof complexity, and waterproofing requirements. Fixed skylights cost less than operable versions. Custom sizes, special coatings, and complex roof geometries increase costs. Always obtain detailed quotes from multiple contractors before proceeding.
Can skylights withstand Chennai's monsoon rains and cyclones?
Properly installed laminated glass skylights with correct structural support, flashing, and waterproofing will withstand Chennai's monsoons and moderate cyclonic conditions. The key is using adequate glass thickness, secure fastening to reinforced roof structures, and multiple layers of waterproofing. Regular maintenance and pre-monsoon inspections ensure continued weather-tight performance.
Do I need a building permit to install a skylight in Chennai?
Most skylight installations in Chennai require building permits, particularly when cutting roof openings or modifying structural elements. Check with your local municipal corporation regarding specific requirements. Permit applications typically require structural drawings, waterproofing details, and calculations demonstrating compliance with building codes. Professional contractors usually handle permit applications as part of their service.
How do I prevent condensation on skylights during Chennai's humid season?
Prevent condensation by using thermally broken aluminum frames that reduce temperature differential between interior and exterior surfaces. Ensure adequate ventilation in the room below the skylight to maintain air circulation. Install a condensation gutter at the lower edge to catch any moisture that does form. Double-glazed or low-E coated laminated glass further reduces condensation risk but increases cost and weight.
Ready to brighten your Chennai home with a professionally installed laminated glass skylight? Connect with experienced glass suppliers, architects, and contractors through the glassy.in directory—India's most comprehensive resource for glass industry professionals. Find qualified experts in your area who understand Chennai's unique climate challenges and can deliver installations that perform beautifully for years to come.