Glass Railings
How to Install Glass Balcony Railings: Complete Structural Guide for Chennai High-Rise Apartments
Glass balcony railings transform Chennai high-rise apartments with unobstructed views while meeting stringent safety standards for coastal environments. Installing these elegant barriers requires careful attention to wind load calculations, proper mounting systems, and waterproofing techniques that withstand the city's humid, salt-laden climate. This comprehensive guide walks you through the entire installation process, from structural assessment to final sealing, ensuring your glass railing system remains secure and beautiful for years to come.
Understanding Structural Requirements and Load Calculations
Before beginning any glass railing installation in Chennai high-rises, you must assess the building's structural capacity and calculate the wind loads your railing system will face. The Indian Standard IS 806 specifies that balcony railings must withstand a minimum horizontal load of 0.75 kN per meter, but coastal high-rises require additional considerations for cyclonic wind pressures.
Chennai's location on the Bay of Bengal coast subjects buildings to wind speeds that can exceed 130 km/h during severe weather events. For apartments above the 10th floor, wind load calculations become critical. The pressure on glass panels increases exponentially with height, requiring thicker glass specifications and reinforced mounting systems. Most Chennai installations use 12mm to 15mm toughened glass for floors below 15 stories, while higher floors may require 17.5mm or laminated glass configurations.
The substrate condition of your balcony floor and parapet wall determines which mounting system you can use. Concrete slabs must have a minimum compressive strength of M20 grade to safely anchor channel systems. Conduct a structural assessment with a qualified engineer who can verify that existing concrete has not deteriorated from salt exposure, a common issue in coastal buildings more than 10 years old.
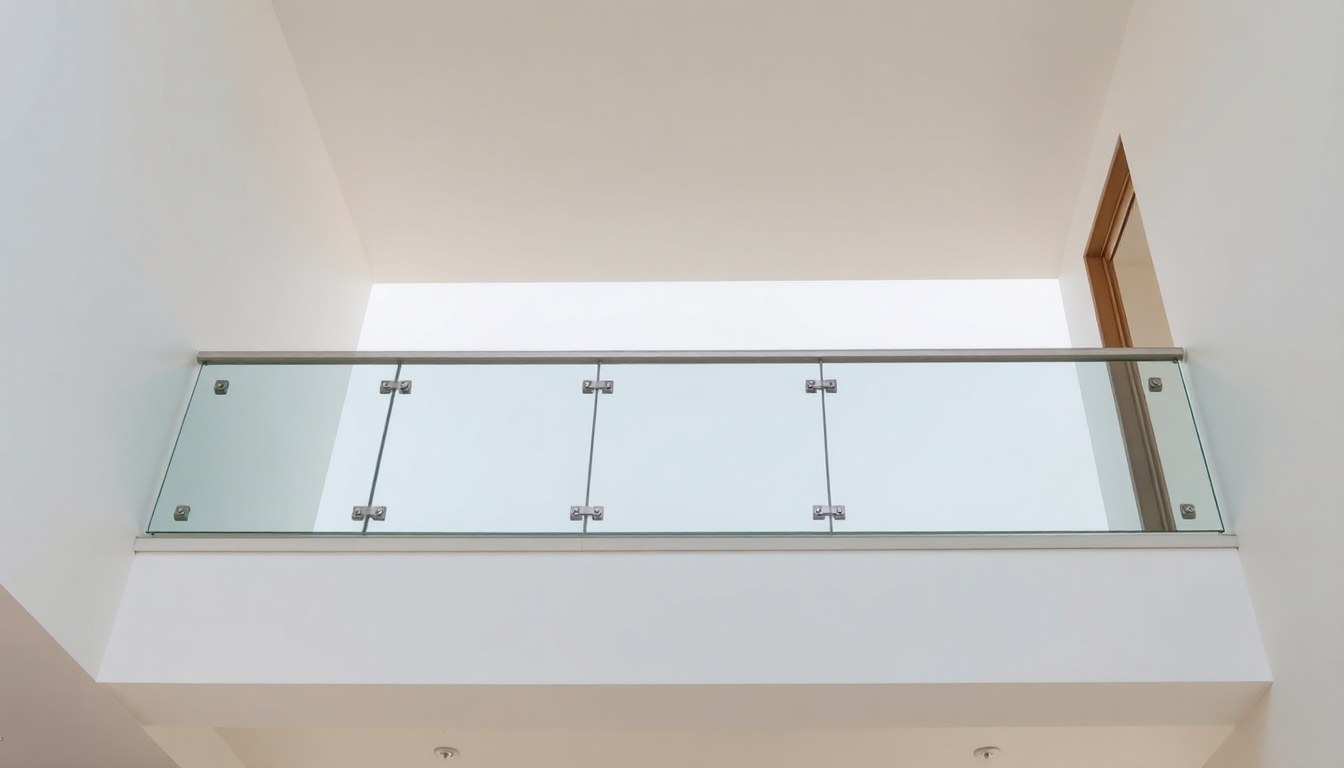
Selecting the Right Mounting System for Your Building
Glass balcony railings in Chennai high-rises typically use one of three mounting systems: base-mounted channels, side-mounted spigots, or post-and-clamp systems. Each offers distinct advantages depending on your building's architecture and structural constraints.
Channel Mounting Systems
The U-channel or base-channel system remains the most popular choice for Chennai apartments due to its superior wind resistance and clean aesthetic. This method involves anchoring an aluminum or stainless steel channel to the balcony floor, into which glass panels slot vertically. The channel distributes wind loads across the entire base rather than at discrete points, reducing stress concentrations. For coastal installations, specify 316-grade stainless steel channels with marine-grade anodization to prevent corrosion from salt spray.
Installation requires precise leveling of the channel before anchoring. Use chemical anchors or expansion bolts at 300mm intervals, ensuring each fastener penetrates at least 75mm into the concrete substrate. The channel must include drainage weep holes every 600mm to prevent water accumulation, which is crucial during Chennai's monsoon season when balconies receive heavy rainfall.
Spigot and Post Systems
Spigot systems use cylindrical stainless steel posts that bolt directly to the balcony floor, with glass panels secured using specialized clamps. This frameless appearance maximizes views but requires more robust structural anchoring. Each spigot must be anchored with minimum four M12 bolts extending 100mm into the concrete. This system works best for buildings with thick floor slabs and where the architect desires minimal visual obstruction.
Post-and-clamp systems offer the greatest flexibility for irregular balcony layouts common in older Chennai buildings. Vertical posts installed at 1000mm to 1200mm intervals support the glass panels through adjustable clamps, allowing for minor alignment corrections during installation. This system accommodates slight variations in floor level that often exist in buildings constructed before modern precision standards.
Step-by-Step Installation Process
Proper installation sequence ensures structural integrity and weather resistance. Begin work during Chennai's dry season between January and May to avoid complications from rain during the curing period for sealants and anchoring compounds.
Surface Preparation and Layout
Clean the balcony floor thoroughly, removing all debris, loose concrete, and existing waterproofing membranes where channels will be anchored. Use a concrete grinder to create a flat, level surface with maximum 2mm variation per meter. Mark the exact centerline where your channel or posts will be installed, accounting for the glass thickness and the required 50mm setback from the balcony edge as specified in National Building Code Section 4.
Drill anchor holes using a rotary hammer drill with carbide-tipped masonry bits. For chemical anchors, ensure holes are cleaned thoroughly with a wire brush and compressed air to remove all concrete dust, which can reduce anchor strength by up to 40%. In older buildings, test-drill one location first to verify you won't encounter rebar or post-tension cables.
Installing the Mounting System
For channel systems, apply a continuous bead of polyurethane sealant along the base of the channel before positioning it on the marked line. This creates a waterproof seal and compensates for minor surface irregularities. Secure the channel temporarily with clamps while you install anchors, working from one end to the other to prevent misalignment.
Tighten anchor bolts to the manufacturer's specified torque values, typically between 25-35 Nm for M10 fasteners in concrete applications. Over-tightening can crack the channel or damage the concrete substrate, while under-tightening leaves the system vulnerable to wind loads. Use a calibrated torque wrench rather than estimating by feel.
For spigot systems, ensure each post is perfectly plumb in both directions before final tightening. Even a 2-degree deviation can create visible misalignment when glass panels are installed. Use a precision level and adjust with shims if necessary, then seal the base with marine-grade silicone to prevent water infiltration beneath the base plate.
Glass Panel Installation and Securing
Handle toughened glass panels with suction cup lifters, never gripping the edges directly. Position setting blocks made of EPDM rubber or neoprene in the channel to support the glass weight and maintain proper drainage gaps. These blocks should be placed at quarter points along each panel's length, never at the corners where stress concentrations occur.
Insert glass panels into channels or clamps, ensuring uniform gaps of 10-12mm between adjacent panels to accommodate thermal expansion. Chennai's temperature variations between air-conditioned interiors and exterior heat can cause significant glass movement. Secure panels with the provided retention system, whether that's top caps for channels or set screws for clamps, again following specified torque values.
Apply structural silicone sealant in all joints between glass panels and at the intersection with building walls. Use only sealants rated for structural glazing applications with proven adhesion to both glass and your mounting system material. For Chennai's coastal environment, specify sealants with UV resistance ratings and fungal growth inhibitors, as the combination of sunlight and humidity promotes biological growth in standard silicones.
Waterproofing and Weather Protection for Coastal Climates
Chennai's coastal location demands exceptional waterproofing measures beyond standard railing installations. Salt-laden moisture penetrates microscopic gaps, corroding metal components and weakening structural connections over time. Your waterproofing strategy must address both standing water and airborne salt spray.
Seal all anchor penetrations with expanding polyurethane foam followed by a cap of marine-grade silicone. This two-layer approach prevents water from tracking along anchor bolts into the concrete substrate, where it can cause rebar corrosion and concrete spalling. Pay special attention to the junction between the railing system and any existing waterproofing membrane on the balcony floor.
Install drip edges along the top rail or glass edge to direct water away from the mounting system. Without proper drainage design, water pools at the base of glass panels, accelerating corrosion and creating unsightly mineral deposits. The channel system's weep holes must remain clear; consider installing removable covers that allow drainage while preventing insect infiltration, a common problem in Chennai's tropical climate.
Apply a protective coating to all exposed metal surfaces, even stainless steel components. While 316-grade stainless steel resists corrosion better than lower grades, it's not completely immune to pitting in marine environments. Clear anodizing or powder coating provides an additional barrier against salt exposure. Inspect and reapply protective coatings annually as part of routine maintenance.
Safety Codes and Compliance Requirements
Glass balcony railing installations in Chennai must comply with multiple safety standards, including the National Building Code of India 2016, IS 806 for safety code for guard rails, and local Chennai Metropolitan Development Authority regulations. Understanding these requirements prevents costly retrofits and ensures occupant safety.
The minimum height requirement for balcony railings is 1050mm measured from the finished floor level, though many engineers specify 1100mm for high-rise applications to provide an additional safety margin. Glass panels must be manufactured from toughened or laminated safety glass that, if broken, fractures into small granular pieces rather than dangerous shards. Always verify that your glass supplier provides test certificates confirming compliance with IS 2553 for toughened glass.
No horizontal member should be positioned between 150mm and 750mm above the floor level, as this could serve as a climbing aid for children. If your design includes a mid-rail or handrail, position it above 900mm. The gap beneath the bottom rail or glass panel should not exceed 110mm to prevent small children from slipping through.
Before final acceptance, conduct a load test by applying 0.75 kN per meter horizontally at the top of the railing for a minimum of 60 seconds. The system should show no permanent deformation or loosening of connections. Document this test with photographs and keep records for building compliance files. Many Chennai housing societies now require such documentation before issuing occupancy certificates for renovated units.
Maintenance Considerations for Long-Term Performance
Glass railings in Chennai's coastal environment require regular maintenance to preserve both appearance and structural integrity. Establish a maintenance schedule from the day of installation rather than waiting for visible problems to develop.
Clean glass panels monthly using a solution of mild detergent and water, avoiding abrasive cleaners that scratch the surface and create nucleation sites for mineral deposits. Salt residue accumulates quickly on coastal balconies, and if left uncleaned, etches the glass surface permanently. Rinse thoroughly with fresh water and squeegee dry to prevent water spots.
Inspect all metal components quarterly for signs of corrosion, paying particular attention to fastener heads and joints where dissimilar metals meet. Apply penetrating lubricant to moving parts in adjustable clamp systems. Check that weep holes remain clear by flushing with water; blocked drainage can cause catastrophic failure during heavy monsoon rains.
Examine sealant joints annually and re-seal any areas showing cracks, gaps, or adhesion failure. Silicone sealants typically last 5-7 years in Chennai's climate before requiring replacement. Budget for complete re-sealing every six years as part of long-term maintenance planning. This preventive approach costs far less than repairing water damage to the building structure.
Frequently Asked Questions
What thickness of glass is required for balcony railings in Chennai high-rises?
For apartments up to 15 floors, 12mm toughened glass is typically sufficient. Buildings above 15 floors should use 15mm to 17.5mm toughened glass or laminated configurations to withstand higher wind loads. The exact specification depends on panel dimensions and wind exposure calculations performed by your structural engineer. Coastal locations always require thicker glass than inland sites at equivalent heights.
How much does glass balcony railing installation cost in Chennai?
Glass balcony railing installation in Chennai typically costs between ₹850 to ₹1,500 per running foot, depending on glass thickness, mounting system choice, and building height. Channel-mounted systems with 12mm toughened glass average ₹950-₹1,100 per foot, while frameless spigot systems with thicker glass can reach ₹1,400-₹1,500 per foot. These prices include materials, installation, and basic waterproofing but exclude structural modifications if your balcony requires reinforcement.
Can glass railings withstand Chennai's cyclonic winds?
Yes, properly engineered and installed glass railing systems withstand cyclonic wind conditions when designed according to IS 875 Part 3 wind load standards. The key is correct calculation of design wind pressure based on building height, terrain category, and cyclone zone classification. Chennai falls in Cyclone Zone III, requiring design wind speeds of 47 m/s. Systems must be engineered specifically for these conditions rather than using generic specifications.
How long does glass balcony railing installation take?
A typical balcony measuring 10-12 feet in length requires 1-2 days for complete installation by experienced professionals. Day one involves surface preparation, mounting system installation, and anchor curing. Day two covers glass panel installation, sealing, and final adjustments. Larger balconies or complex layouts may require additional time. Always schedule installation during dry weather, as sealants and chemical anchors require 24-48 hours of dry conditions for proper curing.
Do glass railings require special permission from Chennai housing societies?
Most Chennai housing societies require prior approval before installing or replacing balcony railings, as these alterations affect the building's exterior appearance. Submit detailed drawings showing the proposed system, materials specifications, and structural calculations to your society's managing committee. Some societies have standardized designs to maintain architectural uniformity. Additionally, buildings in Coastal Regulation Zone areas may require clearance from Chennai Metropolitan Development Authority before proceeding with exterior modifications.
Installing glass balcony railings in Chennai high-rises requires careful planning, proper materials, and adherence to structural standards, but the result is a stunning, durable safety barrier that enhances your living space. For professional installation services and quality glass railing suppliers in Chennai, explore the comprehensive business directory at glassy.in, where you'll find verified vendors, fabricators, and contractors specializing in architectural glass solutions for coastal environments.