Glass Partitions
How to Install Fluted Glass Partitions: Step-by-Step Guide for Indian Homes
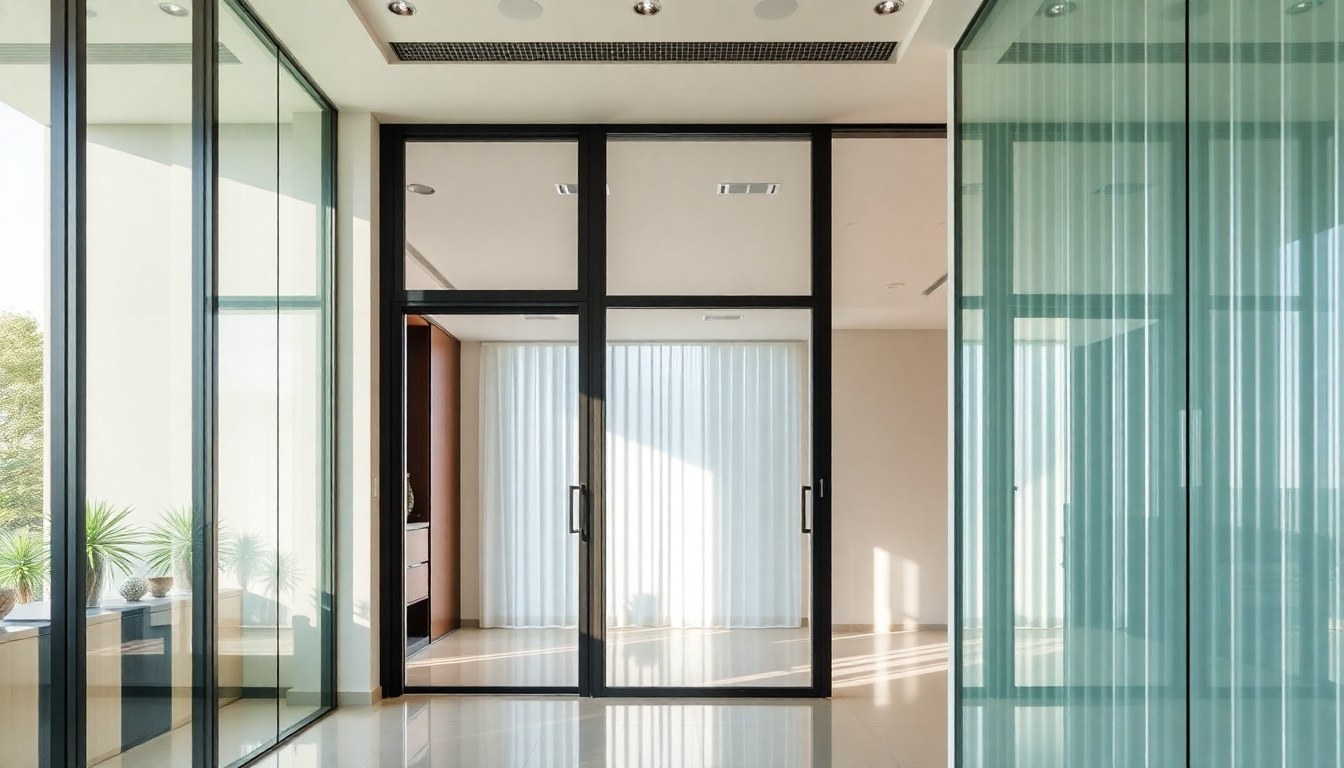
Fluted glass partitions have become increasingly popular in Indian homes, offering an elegant way to divide spaces while maintaining natural light flow and adding textured visual interest. Installing these partitions requires careful planning, precise measurement, and proper technique to ensure a professional finish that enhances your interior design. This comprehensive guide walks you through every step of the installation process, from initial planning to final finishing touches.
Planning and Measurement: Getting the Foundation Right
Before purchasing materials or beginning installation, accurate measurement and planning determine the success of your fluted glass partition project. Start by deciding the exact location of your partition and whether it will extend floor-to-ceiling or serve as a partial divider. Use a laser level or traditional spirit level to ensure your floor and ceiling surfaces are level, as any irregularities will need compensation during installation.
Measure the height from floor to ceiling at multiple points along where the partition will stand. Indian homes, especially older constructions, often have slight variations in ceiling height across a room. Record the shortest measurement as your working height to avoid gaps. Similarly, measure the width at floor level, mid-height, and ceiling level. Create a detailed sketch with all measurements, noting any electrical outlets, switches, or architectural features that might affect installation.
Consider the thickness of your fluted glass panels when planning. Standard fluted glass for partitions typically ranges from 6mm to 10mm thickness. Factor in the frame or channel system you'll use, which adds approximately 20-40mm to the overall partition thickness. This matters particularly in smaller Indian apartments where every centimeter of space counts.
Selecting the Right Frame System and Materials
The frame system you choose directly impacts both the aesthetic appeal and structural integrity of your fluted glass partition. For Indian homes, three main framing options work well: aluminum channels, wooden frames, and frameless systems with specialized hardware.
Aluminum Channel Systems
Aluminum channels remain the most popular choice for fluted glass partitions in India due to their durability, affordability, and resistance to humidity. These systems consist of U-channels for top and bottom mounting and H-channels if joining multiple glass panels. Powder-coated aluminum in black, white, or champagne gold finishes complements most interior styles. Expect to pay ₹150-400 per running foot for quality aluminum channels, depending on finish and profile thickness.
Wooden Frame Options
Wooden frames create a warmer, more traditional aesthetic that suits contemporary Indian homes with natural material palettes. Teak, oak, or engineered wood frames work well, though they require proper sealing against moisture, especially in humid climates like Mumbai, Chennai, or Kolkata. Wooden frames typically cost ₹500-1200 per running foot and require more maintenance than aluminum alternatives.
Frameless Hardware Systems
For a minimalist look, frameless systems use specialized clamps, standoffs, and floor channels to secure fluted glass panels with minimal visible hardware. These systems require thicker glass (typically 10mm minimum) and professional installation expertise. While more expensive at ₹800-2000 per running foot, they create an exceptionally clean, modern appearance that showcases the fluted glass texture beautifully.
Step-by-Step Installation Process
Once you have your measurements and materials ready, follow this systematic installation process for professional results. Working with a helper makes the process significantly easier and safer, especially when handling large glass panels.
Step 1: Mark and Prepare the Installation Area
Using your measurements and a chalk line, mark the exact position of your partition on both the floor and ceiling. Ensure these lines are perfectly parallel by measuring the distance between them at multiple points. If installing on tile or marble flooring common in Indian homes, use masking tape along your marked lines to prevent the drill bit from slipping and to protect the surface from scratches.
Step 2: Install Top and Bottom Channels
Begin by installing the top channel first. For concrete ceilings typical in Indian construction, drill pilot holes every 12-15 inches using a 6mm masonry bit. Insert appropriate wall plugs and secure the channel with corrosion-resistant screws. Ensure the channel is perfectly level before tightening all screws completely. Next, install the bottom floor channel, ensuring it aligns precisely with the top channel using a plumb line or laser level.
For false ceiling installations, locate the ceiling joists or use toggle bolts rated for the weight of your glass partition. A standard 8-foot tall, 4-foot wide fluted glass panel weighs approximately 25-35 kg, so proper anchoring is essential for safety.
Step 3: Prepare and Insert the Glass Panels
Clean your fluted glass panels thoroughly before installation using a microfiber cloth and glass cleaner. Handle the glass wearing clean cotton gloves to avoid fingerprints on the textured surface. Apply rubber or silicone gaskets inside the channels to cushion the glass and prevent rattling. These gaskets also help accommodate minor irregularities in floor or ceiling levelness.
Slide the glass panel into the top channel first, tilting it at an angle. Once the top edge is fully seated in the upper channel, carefully swing the bottom into position and lower it into the bottom channel. This technique prevents damage to the glass edges and makes installation manageable even for larger panels.
Step 4: Secure and Stabilize
Once the glass is positioned, insert setting blocks or shims at the bottom channel to support the glass weight properly. These small supports, typically made of rubber or plastic, prevent the glass from sitting directly on the metal channel, which could cause stress points and potential cracking. Space setting blocks approximately 6-8 inches apart along the bottom edge.
If your partition includes door functionality, now is the time to install the pivot hardware or sliding mechanism according to the manufacturer's specifications. Many Indian suppliers provide complete hardware kits specifically designed for fluted glass applications.
Step 5: Seal and Finish
Apply clear silicone sealant along the joints where the channels meet the floor and ceiling. This prevents dust accumulation and provides a finished appearance. Use painter's tape on either side of the joint for clean, straight sealant lines. Smooth the sealant with a wet finger or specialized tool, then remove the tape immediately before the silicone begins to cure.
For wooden frames, apply touch-up finish to any areas affected during installation. Check all screws and fasteners one final time, ensuring everything is secure but not over-tightened, which could stress the glass.
Professional Tips for Indian Climate Conditions
Indian homes face unique challenges from monsoon humidity, summer heat, and regional climate variations that affect glass partition installations. In coastal cities like Mumbai, Goa, or Visakhapatnam, use marine-grade stainless steel or powder-coated aluminum hardware to prevent corrosion from salt-laden air. Apply anti-corrosion coating to all metal components before installation.
During monsoon season, avoid installation if possible, as high humidity affects sealant curing and can introduce moisture between glass and frame. If you must install during rainy months, ensure the work area remains dry and well-ventilated. Allow extra curing time for all adhesives and sealants—typically 48-72 hours instead of the standard 24 hours.
In regions with extreme temperature variations like Delhi, Rajasthan, or Punjab, leave a 3-4mm expansion gap between glass edges and frame channels. This allows for thermal expansion and contraction without stressing the glass. Fill these gaps with flexible sealant rather than rigid materials.
Common Installation Mistakes to Avoid
Even experienced DIY enthusiasts make mistakes when installing fluted glass partitions. Avoid measuring only once—the old carpenter's rule of "measure twice, cut once" applies equally to glass installation. Incorrect measurements lead to ill-fitting panels that compromise both appearance and structural integrity.
Never over-tighten fasteners when securing channels or hardware. Excessive pressure can create stress points in glass, leading to cracks that may appear immediately or develop over time. Tighten screws until snug, then add just a quarter turn more.
Resist the temptation to skip the setting blocks or rubber gaskets. These small components play crucial roles in distributing weight evenly and preventing direct glass-to-metal contact. The minimal cost of these materials (₹50-100 for a complete partition) is worthwhile insurance against future problems.
Don't rush the sealant curing process. Walking heavy traffic near freshly installed partitions or cleaning them before sealants fully cure can compromise the installation. Follow manufacturer recommendations for curing time, and add extra time in humid conditions.
Working with Professional Installers
While DIY installation is possible for those with good handyman skills, complex projects benefit from professional expertise. Experienced glass installers bring specialized tools, knowledge of local building practices, and insurance coverage that protects your investment. If your partition includes doors, curved sections, or integration with existing architectural elements, professional installation often proves more cost-effective than attempting it yourself and potentially damaging expensive materials.
When hiring professionals in India, request references and photos of previous fluted glass installations. Reputable firms provide written quotes detailing material costs separately from labor charges, typically ranging from ₹150-400 per square foot for installation services. Architectural firms like studio IN-GRID can provide design guidance and connect you with experienced glass installation specialists who understand both aesthetic and technical requirements.
Verify that installers carry appropriate liability insurance and follow safety protocols. Glass installation involves risks, and professional installers should use proper safety equipment including cut-resistant gloves, safety glasses, and appropriate lifting techniques or equipment for large panels.
Maintenance and Long-Term Care
Properly installed fluted glass partitions require minimal maintenance but benefit from regular care. Clean the textured surface using a microfiber cloth dampened with a solution of water and mild dish soap. The vertical grooves of fluted glass can trap dust, so clean from top to bottom, allowing dirt to fall rather than spreading it across the surface.
Avoid abrasive cleaners or rough scrubbing pads that might scratch the glass surface. For stubborn marks, use a specialized glass cleaner designed for textured surfaces. In hard water areas common across India, wipe down glass after cleaning to prevent mineral deposits from forming in the grooves.
Inspect sealant joints annually, especially in high-humidity areas. Reapply silicone sealant if you notice gaps or deterioration. Check metal frames for any signs of corrosion and touch up powder coating if needed. Wooden frames may require occasional re-oiling or refinishing depending on the wood type and finish used.
Frequently Asked Questions
What thickness of fluted glass should I use for a room partition?
For standard room partitions in Indian homes, 8mm or 10mm tempered fluted glass provides the ideal balance of strength, safety, and cost-effectiveness. Use 6mm glass only for small panels or cabinet applications. If your partition will include a door or experiences regular contact, opt for 10mm or 12mm thickness for added durability and stability.
Can I install fluted glass partitions on false ceilings common in Indian apartments?
Yes, but with proper reinforcement. Standard gypsum false ceilings cannot support the weight of glass partitions alone. Ensure the top channel is anchored to the concrete slab above using appropriate fasteners that penetrate through the false ceiling. Alternatively, install blocking between ceiling joists specifically to support the partition, or use floor-to-false-ceiling height panels with additional floor-based support.
How much does it cost to install a fluted glass partition in India?
Material and installation costs vary by location, glass thickness, and frame type. Expect to pay ₹450-800 per square foot for 8mm tempered fluted glass with aluminum framing, including basic installation. Wooden frames, frameless systems, or premium finishes increase costs to ₹900-1,500 per square foot. A typical 8-foot by 6-foot partition costs approximately ₹22,000-38,000 including materials and professional installation.
Do fluted glass partitions provide sound insulation?
Fluted glass partitions offer moderate sound dampening but are not soundproof. Single-layer glass partitions reduce noise by approximately 25-30 decibels, suitable for visual privacy and reducing conversational noise between spaces. For better sound insulation, consider double-glazed fluted glass panels or combine your glass partition with soft furnishings like curtains or acoustic panels that absorb sound.
How long does fluted glass partition installation take?
A straightforward single-panel partition typically takes 4-6 hours for professional installation, including preparation, mounting, and finishing. Complex installations with multiple panels, doors, or custom configurations may require 1-2 full days. DIY installation generally takes longer, especially for first-time installers—plan for a full weekend to complete the project properly without rushing.
Ready to transform your home with elegant fluted glass partitions? Visit the glassy.in directory to connect with experienced glass suppliers, fabricators, and installation professionals across India who can help bring your vision to life with quality materials and expert craftsmanship.